Last year I finished the build of an autonomous rover using a kit from ServoCity’s Actobotics line. The goal of the project was simple: to terrorize my pet. I had planned for the rover to recognize my dog and chase him around the apartment. However, once the system could navigate around a room doing a decent job of obstacle avoidance I considered it good enough and decided to change focus. I had already been thinking about building a larger, more capable rover for mapping and navigating outdoor obstacle courses and shelved the little guy for now. I especially wanted to start experimenting very small LIDARs since I’ve never directly worked with that type of sensor.
Over the course of the project I found that discussing the project with people was a great way to problem solve and also a very good way to determine how well I understood what I was building. I discovered this was especially true in writing — i.e. on forums. So I decided that for my next build I would blog the entire process from beginning to end. And what better time to launch than National Robotics Week?
I’ll start coverage of the design and part selection for the new rover in the next post. But first, a very quick overview of the first rover.
Rover One
The Whippersnapper kit is pretty bare bones: it includes a chassis and four pretty basic motors. No tools are required for the assembly of the chassis since all of the components snap together with a little force. Only a screwdriver was needed to connect the motors to the chassis. Extremely easy to assemble.
Hardware Overview
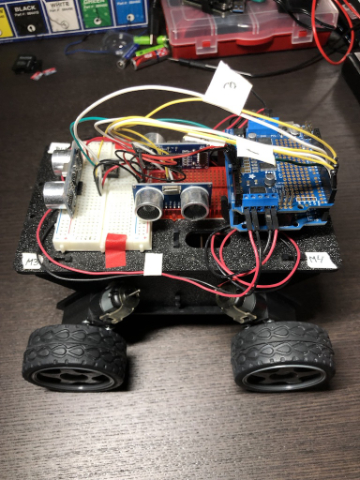
I took the most obvious route and built the entire system around the Arduino Uno R3. I used the Adafruit Motor/Stepper/Servo Shield for Arduino which allowed me to control all four motors from one board. That’s important because the included motors are not that powerful so I tried to save weight where I could. All connections in the system are fed into this shield and passed through to the Uno (except for the motors themselves).
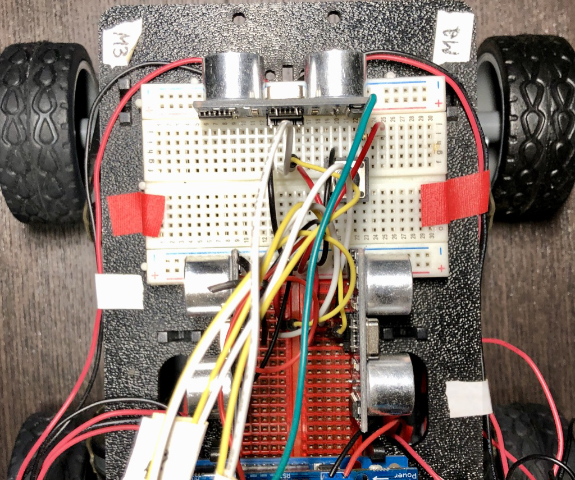
For navigation I used three ultrasonic sensors from Elegoo purchased on Amazon. These things are dirt cheap (five for $8) and work about as well as you’d expect. They are interesting to play around with, but I found them to be very noisy, sort of inaccurate, and using multiple sensors requires some orchestration (described below) which can slow the navigation process down. I could see these sensors doing well in situations where you’re looking for walls (e.g. in a maze), but in a cluttered environment there are better options.
One sensor was oriented facing forward, one facing left, and one facing right as shown below. The ultrasonics were all connected to the motor shield board and passed through to the digital pins on the Uno. See the picture below for a bird’s eye view of the sensors on the rover.
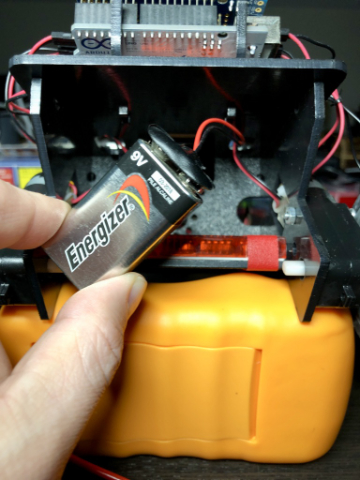
In order to rove the system needs power on the move. The entire system runs off a 9V battery. I purchased a five-pack of these 9V battery clips because of the barrel connector which fits the Uno perfectly. However, in this system, all connections are passed through the motor controller shield, so I cut the connector off the clip and fed the wires into the shield’s screw terminals. It’s good to have options.
Software Overview
I’m going to cover two elements in this section: the software libraries I used and the navigation/obstacle avoidance algorithm.
For interfacing with the motor controller shield I used the Adafruit Motor Shield Library. This API was a breeze to use. You basically create a motor shield object and initialize N motors which have all the utility methods you’ll need for controlling the motors. Check out this example to get started.
Steering was an interesting subject for me. During the process of figuring out steering for this rover, I realized just how little I’ve thought about the topic. I drive a vehicle every day, and take all types of wheeled transportation, and I never think about the concepts behind how they steer.
The Whippersnapper does not have turnable steering. That means the wheels can only be commanded to go forwards and backwards — there is no ability to articulate the wheels left and right to execute a turn. So turning needs to be done via differential steering. The figure below, from this paper, does a pretty good job of depicting differential steering.
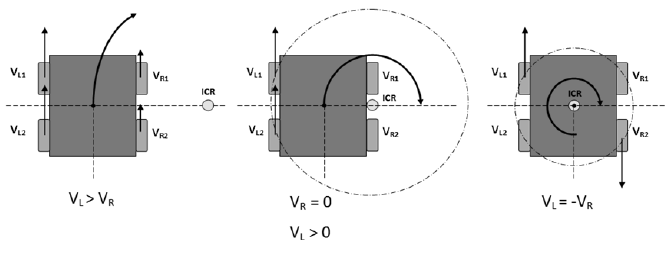
In the system I have independent control over each wheel, so steering is essentially a game of holding some wheels constant (or moving them in the opposite direction) while turning others to achieve rotation. I ended up just keeping the direction and speed constant on each side of the rover. So to turn left, I turn the left-side wheels backward and the right-side wheels forward, to move forward move both sides forward, etc. Pretty simple with lots of room for fine-tuning.
So how does the rover decide which direction to go? Well, it heads in the direction that is less likely to have something in the way! As mentioned earlier, there are three ultrasonic sensors covering forward, left, and right on the vehicle. In the main loop of the controller, I read from each sensor serially going left, forward, and right. I keep the vehicle stationary during ten or so cycles of measurements and then go in the direction which has no obstacle or an obstacle/object that’s furthest away.
For interfacing with the sensors I used the excellent New Ping library by Tim Eckel. This interface was easy to use just like the Adafruit motor controller library. Here’s an example which either didn’t exist, or I somehow missed, at the time I was working on this portion of the system. It is conceptually exactly what I was doing in my system, but much more concise and elegant.
Rover Two: Akanon
So that was a high-level overview of the major elements of Rover One. In the next post, I’ll cover the conceptual design of Rover Two which I’ve named Akanon (bonus points if you’ve been there). I’ll also cover part selection and the bill of materials since I’ve already received all the parts. Then I’ll get into the build process. I plan to go into a good amount of detail for each stage - especially the sensor fusion, mapping, and navigation algorithms.
See you next time and happy National Robotics Week!