Blogging is hard. It’s taking me a lot longer to put these posts together than I had thought it would. Whenever I have free time I just want to focus on building/developing, but I’m going to aim for a new post every two or three weeks.
In this post I’m going to cover the part selection for my new rover, Akanon. As I described in the last post, the goal for this system is autonomous outdoor mapping and navigation. I especially wanted to dig into sensor fusion using LIDAR since I’ve never had the opportunity to work with one this small.
1. Chassis Selection
There are not a huge number of quality medium-large hobbyist chassis suitable for the outdoors. You very quickly go from a million low quality small chassis to large professional robotics platforms like the Jackal UGV from Clearpath Robotics. It looks like an awesome system, but you know you’ve hit the professional market when they make you request a quote.
So after a decent amount of searching I narrowed my choices down to four options:
- Actobotics Nomad
- Turtle Rover, now called Leo Rover
- Turtlebot3 Waffle Pi
- Fabricate my own
I have very little fabrication skills, and no real tools right now, so I eliminated option [4] for this project.
I started with Actobotics [1] because I was impressed by their kit during my last project. The parts were high quality and the build process was smooth. What the Nomad chassis offers that my old kit does not is major modularity and extensibility. RobotZone, the company that owns Actobotics, also owns ServoCity, and sells a ton of structural components, motion components, and other hardware which can be integrated onto the Nomad and their other premium frames.
The Nomad is much more spartan than the other chassis on my list. It is completely un-opinionated regarding sensors and compute platforms, which is perfect because I want to select those parts for myself. It also helps with the price - the Nomad is only $280 and includes motors which look perfect for the outdoors.
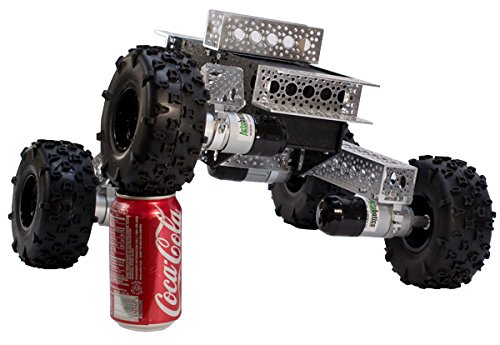
Spoiler: I chose the Actobotics chassis for Akanon. However, I do want to highlight two other chassis I considered because I think they are awesome and I’ll probably purchase them as well.
1.1 Turtle Rover / Leo Rover
The Turtle Rover (now called the Leo Rover) is like the perfect prosumer chassis for outdoor roving. The components appear to be high quality. I had a hard time finding out exactly what the system is made of, but they do claim that it’s “watertight” and IP66 rated (though untested). This sort of became the theme with Leo Rover… the documentation is very sparse and feels like a first draft. At the time I was performing this search there were a lot of inconsistencies, TBDs, and it did not seem like there was one place to find information on their website. (Note - I just took a look at their manual again, seven months later, and it has improved significantly.)
Ultimately, what drove me to the Nomad was that the Leo Rover comes with a lot of hardware that I wanted to choose myself. In particular, I am planning on using an embedded GPU to explore some sensor processing ideas I’ve had. I also like Arduino and planned to re-use some of the code I wrote for Rover One. It doesn’t look like the CORE2 board runs the Arduino bootloader without some hacks.
I do like the Leo’s tight integration with ROS and I will be using ROS for Akanon, but I’m planning on doing my own integration - that’s where the fun is! I’m not planning on remotely operating Akanon, since it’s going to be fully autonomous, so their remote control application didn’t add much value for me.
So while none of what I’ve mentioned were show stoppers, they did push me to the Nomad. The Leo has a $2400 price tag, but does come with a lot of components. If you are looking for an all-inclusive platform that’s ready to operate out of the box (yet is extensible), this looks like a good choice. I was looking for a platform that is a lot more barebones than the Leo.
1.2 Turtlebot 3 Waffle Pi
The Turtlebot3 Waffle Pi (T3WP) looks like fantastic system. The documentation is very good and there is a major emphasis on ROS integration. The story with T3WP is very similar to Leo Rover. Looks like a great system, but not right for this project. I wasn’t interested in using the Raspberry Pi and I wanted to select my own LIDAR. Also, my goal is to use Akanon outdoors and I don’t think the Waffle is suited for that use - especially on rough terrain.
The T3WP is quite a bit cheaper than the Leo Rover. I’ve generally seen the T3WP for about $1400. Where the Leo is probably better suited for university labs, the Waffle seems like a good choice for hobbyists looking to move beyond eBay chassis. If you’re looking to learn ROS with a physical platform and don’t want to mess around with selecting, buying, and integrating hardware I think T3WP looks like an excellent choice.
So, in summary, I’ll probably end up buying both the Leo Rover and Turtlebot 3 Waffle in the near future. These two kits were the best I was able to find if you’re looking to move beyond the $30 plastic chassis from Amazon or eBay. If you have any other suggestions, please email me!
2. Motor Controllers
The Nomad package includes four 313 rpm motors. The data sheet says the motor has a voltage range of 6-12V and a 20A stall current. The specs don’t list a continuous operating current, so I just went with 25% of the stall current (5V) for my search.
I first asked ServoCity what motor controllers they recommended and they said they like to use these controllers for the Nomad. Unfortunately, those were out of stock while I was looking to buy. They also carry a slightly less powerful controller which was out of stock as well. The more powerful 45A units were in stock, but I didn’t that they were worth the price and decided to look for alternatives.
After looking through many options, I noticed a lot of people recommending Pololu. I ended up finding this dual channel controller which far exceeded spec for only $50 each (compared to the Roboclaw at $125 each!). However, as I was about to place the order from Pololu I noticed the dual channel 15A Roboclaw units were back in stock. So I ended up buying /both/ the Roboclaw and Pololu units. I figure it can’t hurt to have options during the build process.
3. Microcontroller
This choice was pretty easy. I have a lot of experience with Arduino and decided pretty early to stick with it. I also have a good amount of control code, and shield boards, I am planning to reuse.
I did go for the larger Arduino Mega 2560 over the Arduino Uno R3 I used on Rover One because I wanted more I/O. I also decided to give an off-brand, Elegoo, a shot for this project.
4. Sensors
4.1 LIDARs
For this class of vehicle, you’re generally looking at 2D line scanners. These LIDARs only take measurements in azimuth at one elevation. In other words, you basically get a single 360 degree slice of the world around you.
SLAMTEC has a range of small 360 degree scanning LIDARs sold under the RPLIDAR product line. They have decent documentation, a good SDK (with lots of source code on Github), and look to be pretty easy to integrate and simulate with ROS.
I should say up-front I am not a LIDAR expert. That said, I did find the performance numbers to be a bit inconsistent and at times optimistic. It’s pretty obvious that these units aren’t going to hit their max range if you also crank up the sample and scan frequencies. Yet they don’t list range/sample frequency, and scan frequency combinations that will work. They also don’t give different performance numbers for indoors versus outdoors on all the models (just on the RPLIDAR A3M1)! Only the A3M1 specs really discern between detection of light and dark objects at range (the RPLIDAR A1M8 data sheet just says “white objects” under comments in the scan range parameters - LOL). In general, SLAMTEC obviously puts much more work into measuring the performance for their more expensive LIDARs. I get it. The data sheets are much more detailed across the board versus the website (and any of their retailers websites), but still don’t answer the mail for details on their less expensive units.
For comparison’s sake, I also included a LIDAR from another company, the Hokuyo UST-10LX, that people have mentioned favorably. It looks to have the same qualities that the RPLIDARs have: good documentation, SDK, and ROS integration. However, it’s much more expensive. For the price you do get much better resolution than most of the RPLIDARs and certainly a faster scan rate than any of them. It also has a 100BASE-TX Ethernet connection which is a much higher bandwidth communication interface than the USB2.0 interface provided by the RPLIDARs. In fact, the A3M1 has a baud rate of only 256 kbps. We’ll see if that is an issue.
| Model | Price ($) | Scan Range (light-dark objects, in meters) | Sample Frequency (kHz) | Scan Frequency (Hz) | Angular Resolution (deg) | Interface |
|---|---|---|---|---|---|---|
| RPLIDAR A1M8 | 100 | 0.15-10 | 8 | 5.5 | 1 | USB |
| RPLIDAR A2M6 | 450 | 0.20-18 | 8 | 10 | 0.9 | USB |
| RPLIDAR A2M8 | 319 | 0.20-12 | 8 | 10 | 0.9 | USB |
| RPLIDAR A3M1 | 600 | 8-25 | 16 | 15 | 0.225 | USB |
| Hokuyo UST-10LX | 1600 | 10-40 | ?? | 40 | 0.25 | Ethernet |
| RPLIDAR S1 | 650 | 10-40 | 9.2 | 10 | 0.391 | USB |
Note the Hokuyo UST-10LX is not a 360 degree scanner - it sweeps over a 270 degree field of view. All the other devices are 360 degree LIDARs.
In the end, I decided to give the SLAMTEC A2M8 a shot. I wasn’t convinced that the upgrade to the A2M6 or the A3M1 was worth the price. I decided to build with the A2M8 and I’ll upgrade if necessary.
As I was writing this post SLAMTEC released a new LIDAR called the RPLIDAR S1. It looks like the S1 has much better performance outdoors. I’ll see how the A2M8 does, but I could see myself moving to the S1 eventually if I have issues outside.
4.2 Monocular Cameras
For a couple years I’ve been following a camera with built-in object detection and tracking called the Pixy. This camera is built by Charmed Labs, a company that spun out of a robotics lab at Carnegie Mellon University.
In the middle of last year the company released the Pixy2 sensor. Apparently the sensor can feedback motion commands to a robot based on object detection and tracking results. I think this feature is perfect for Akanon. Essentially, there will be two navigation data paths in the system: short-term motion (immediate crash avoidance) and long-term planning (route/trajectory generation).
Because the Pixy2 is connected directly to the Arduino, it can send high-speed, short-term planning assistance directly to the navigation loop within the Arduino. Additionally, image frames and tracking data can be sent off the Arduino to the Single-Board Computer (SBC, described below) I’m using for sensor processing for longer term path planning, etc.. This frame, and track information, will be fused with the LIDAR. This is also helpful because, as I described before, the LIDAR does not scan in elevation. However, I purchased the pan/tilt kit for the Pixy2, so in addition to fusing the imagery with LIDAR data, Akanon will also be able to explore above and below the line drawn with the laser.
The Pixy2 detection algorithms can be trained to recognize new objects. I have a few ideas for how to use this capability. First, as described above, the Pixy2 can be trained to recognize common objects that exist outdoors such as rocks, sticks, trees, buildings, etc. This is useful because the LIDAR doesn’t provide that type of information. The LIDAR can tell you something is there, it’s rough distance from the scanner, and perhaps you can infer what it is by the curvature of the slice (e.g. is it flat or more round?), but it’s pretty coarse-grained information. Essentially just a 2D line. Fusing - or even just evaluating - both sensor inputs gives you a better picture and allows for a more informed decision. In other words, instead of avoiding every single line the LIDAR picks up in the world, perhaps there are some objects that Akanon can roll over or through! That can be inferred by evaluating the size of the object in the frame and the distance the object is from the rover (by using the LIDAR).
The Pixy2 could also be trained to recognize markers in the world if I ever use the system in a competition!
4.3 Stereo Cameras
I have not purchased a stereo camera yet, but I did evaluate and consider these two devices:
Both packages contain a lot of value and are very interesting. They each have a tracking solution built into the camera essentially providing a self-contained SLAM result. I think it would be cool to try and use these devices on a project. I think fusing the LIDAR with the Pixy2 is more interesting right now, but I’ll probably buy one of these stereo camera down the road.
4.4 Inertial Measurement Unit
I’m still working through my SLAM approach for this project. In fact, that may be the next blog post I make. I’ve seen a lot of research in the area of visual SLAM (V-SLAM). It looks like people are getting food results from a stereo camera or even just a single camera. One of my goals for this project is to mess around with low-cost LIDARs, but I find V-SLAM very interesting. Additionally, we use a lot of deep learning at work and I’ve seen some very interesting SLAM and navigation work using deep neural networks at conferences and in papers. I’m going to need to do some more reading on this and it is perfect content for a future blog post!
Anyway, some of the work I mentioned above is done without an IMU. But IMUs are cheap enough so I just went ahead and purchased one in case I need it. I picked up the Adafruit 9DOF IMU based on the BNO055 chip for $30. This chip has a fusion engine on it and can output three-axis accelerator, gyroscope, and magnetometer vectors as well as fused orientation information in a number of representations. It’s nice to have options - especially when using data-driven machine learning.
More to come on this topic!
5. Single-Board Computer
I planned from the beginning to go with an NVIDIA Jetson embedded GPU on Akanon. I’ve worked with NVIDIA’s Jetson products for years and I was excited to use a Jetson TX2 on this project. However, right while I was in the middle of planning my materials, I attended NVIDIA’s GPU Technology Conference (GTC) in San Jose and they announced the Jetson Nano. The Nano is much less powerful than the TX2 - but only $100! Honestly, the TX2 is probably a better board for this project, but I think the challenge of getting Akanon running on the Nano is interesting.
Of course, since I’m moving so slow on this blog post, NVIDIA released another new embedded GPU called the Jetson Xavier NX for $400. The Xavier NX is the perfect platform for this project. I’ll see how it goes with the Nano, but will probably move on to the Xavier NX when it’s released in March 2020.
6. Total BOM
So, all in, I’ve spent $1049 ($1149 including the Pololu MCs) on materials for Akanon so far.
| Item | Price | Quantity | Total |
|---|---|---|---|
| Actobotics Nomad | 280 | 1 | 280 |
| ELEGOO Arduino Mega 2560 Board | 14 | 1 | 14 |
| Roboclaw 2x15A Motor Controllers | 90 | 2 | 180 |
| RPLIDAR A2M8 LIDAR | 320 | 1 | 320 |
| Charmed Labs Pixy 2 Image Sensor | 60 | 1 | 60 |
| Charmed Labs Pan/Tilt Kit for Pixy 2 | 30 | 1 | 30 |
| Adafruit 9DOF IMU | 35 | 1 | 35 |
| NVIDIA Jetson Nano | 100 | 1 | 100 |
| Batteries, Cases, and Connecters | 10 | 3 | 30 |
I’m going to try and go with the same power supply approach from Rover One. I’ll obviously need to use more batteries, but I’m going to try and go with the same hardware.
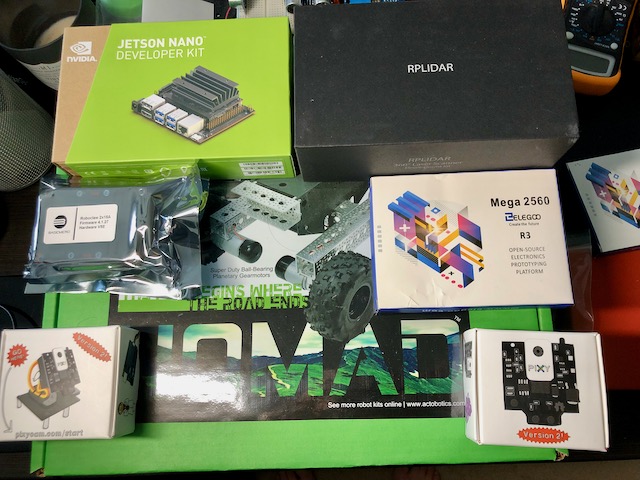
And, finally, here’s a picture with all of the parts listed in the table above.
7. Next Post
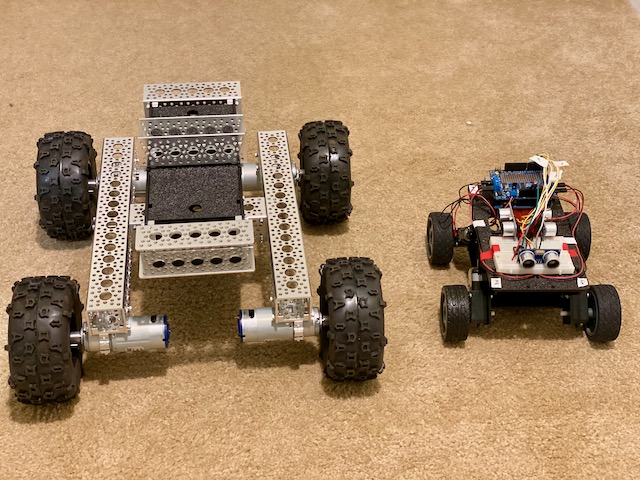
I have a few ideas for the next post. I’m thinking it’ll be LIDAR and SLAM focused. I already built the chassis and forgot to take pictures of the build process (blog fail), so here’s a picture of the Nomad next to Rover One. To be continued in hopefully less than eight months!